Google Data Studio on BigQuery - usage and cost control
Data Studio is a reporting tool that comes along with other Google Cloud Platform products to bring out a simple yet reliable BI platform. There are…
Read moreAt GetInData we use the Kedro framework as the core building block of our MLOps solutions as it structures ML projects well, providing great abstraction for nodes, pipelines, datasets and configuration. This creates easy to maintain and composable code for data processing, training and evaluating models, while not limiting the machine learning frameworks Data Scientists can use. We also provide workshops for Data Scientists to get them up-to-speed with making Kedro work for them to solve real problems and provide value for our clients. One of the recent use cases we encountered that was not supported out-of-the-box by Kedro was the distributed training scenario. Data Scientists love neural networks, but training them at scale usually requires more compute power than is available on a single machine (even with GPU). Larger networks such as BERT, GPT-2, ViT or even top variants of EfficientNet and ResNet combined with large datasets take a long time to train, which results in both unhappy Data Scientists and a longer experiment feedback loop, which is discouraging for business.
Combining the worlds of neural networks, Kedro and distributed training can be quite a challenge and requires a lot of manual configuration. We knew this, so we decided to make yet another contribution to the Kedro community. In this blog post we will demonstrate how to use PyTorch with Kedro to train neural networks and then easily scale-out the training using distributed computing, thanks to our recently-released new feature for the Kedro AzureML plugin.
We will use the same scenario used in Kedro AzureML’s quickstart (kedro-azureml >= 0.2.2 is required here) with modifications for neural network training with PyTorch. For that purpose, we added PyTorch Lightning as an additional dependency to the project. We’re skipping the initial setup covered by the docs in this blogpost and moving on to the important parts. We encourage you to go through the plugin’s quickstart first.
Please note that model saving and future productionisation of the trained model are not included in the scope of this blog post or related code.
We remove the “candidate modeling pipeline” from the data science pipeline of the Spaceflights starter and modify the pipeline itself by replacing the original train_model node with our train_pytorch_model node. Besides the dataset, our node also accepts a number of neural network specific parameters, such as: number of epochs, batch size, learning rate and most importantly, the number of nodes to use for distributed training. We use a simple multi-layer neural network made out of linear layers with Leaky ReLU activation plus batch normalization in the input layer. As the Spaceflights project has a regression target, we use Smooth L1 loss to train our model. We pass all of the required parameters to PyTorch Lightning’s Trainer class and call fit to train the model.
def train_model_pytorch(
    X_train: pd.DataFrame,
    y_train: pd.Series,
    num_nodes: int,
    max_epochs: int,
    learning_rate: float,
    batch_size: int,
):
    class SimpleNetwork(pl.LightningModule):
        def __init__(self, n_features: int, lr: float) -> None:
            super().__init__()
            self.lr = lr
            self.normalize = nn.BatchNorm1d(n_features)
            internal_features = 1024
            hidden_layer_size = 128
            depth = 10
            self.layers = nn.Sequential(
                nn.Linear(n_features, internal_features),
                nn.Sequential(
                    nn.Linear(internal_features, hidden_layer_size),
                    nn.LeakyReLU(),
                    *sum(
                        [
                            [
                                nn.Linear(hidden_layer_size, hidden_layer_size),
                                nn.LeakyReLU(),
                            ]
                            for _ in range(depth)
                        ],
                        [],
                    ),
                ),
                nn.Linear(hidden_layer_size, 1, bias=False),
            )

        def forward(self, x):
            normalized = self.normalize(x)
            outputs = self.layers(normalized)
            return outputs.squeeze()

        def training_step(self, batch, batch_idx):
            x, y = batch
            outputs = self.forward(x)
            loss = F.smooth_l1_loss(outputs, y)
            return loss

        def predict_step(
            self, batch: Any, batch_idx: int, dataloader_idx: int = 0
        ) -> Any:
            return self.forward(batch[0])

        def configure_optimizers(self):
            return Adagrad(self.parameters(), lr=self.lr)

    epochs = max_epochs
    data = create_dataloader(X_train.astype("float"), y_train, batch_size=batch_size)
    model = SimpleNetwork(X_train.shape[1], learning_rate)

    trainer = pl.Trainer(
        max_epochs=epochs,
        logger=True,
        callbacks=[TQDMProgressBar(refresh_rate=20)],
        num_nodes=num_nodes,
    )

    trainer.fit(model, train_dataloaders=data)
    return model
The Spaceflights starter uses the pandas-based dataset and we need to transform it into the PyTorch DataSet (and later DataLoader) like this:
def create_dataloader(x: pd.DataFrame, y: pd.Series=None, predict=False, batch_size=256):
    data = [torch.from_numpy(x.values).float()]
    if y is not None:
        data.append(torch.from_numpy(y.values).float())
    return DataLoader(TensorDataset(*data), shuffle=not predict, batch_size=batch_size)
Once the model is trained, we then need to modify the evaluation code to use a PyTorch-based model instead of a Scikit-Learn one.
def evaluate_model(model: pl.LightningModule, X_test: pd.DataFrame, y_test: pd.Series):
    """Calculates and logs the coefficient of determination.

    Args:
        model: Trained model.
        X_test: Testing data of independent features.
        y_test: Testing data for price.
    """

    with torch.no_grad():
        trainer = pl.Trainer()
        dataloader = create_dataloader(X_test.astype("float"), predict=True)
        y_pred = trainer.predict(model, dataloaders=dataloader)
        y_pred = pd.Series(
            index=y_test.index, data=torch.cat(y_pred).reshape(-1).numpy()
        )

    r2 = r2_score(y_test, y_pred)
    mae = mean_absolute_error(y_test, y_pred)
    logger = logging.getLogger(__name__)
    logger.info("Model has a coefficient R^2 of %.3f on test data.", r2)
    logger.info("Model has MAE of %.3f on test data.", mae)
Once these changes are made, the last thing to do is to modify the node’s usage in the pipeline definition - we need to pass all of the neural network params we want to use. Remember to add them in the conf/base/parameters/data_science.yml file too.
node(
                func=train_model_pytorch,
                inputs=[
                    "X_train",
                    "y_train",
                    "params:model_options.num_nodes",
                    "params:model_options.epochs",
                    "params:model_options.learning_rate",
                    "params:model_options.batch_size",
                ],
                outputs="regressor",
                name="train_model_node",
), 
Contents of data_science.yml in parameters:
data_science:
  active_modelling_pipeline:
    model_options:
      epochs: 10
      learning_rate: 1.0e-3
      batch_size: 256
      num_nodes: 1
      test_size: 0.2
      random_state: 666
      features:
        - engines
        - passenger_capacity
        - crew
        - d_check_complete
        - moon_clearance_complete
        - iata_approved
        - company_rating
- review_scores_ratingHaving the pipeline prepared, we can now run the code locally to test out the overall pipeline correctness. For the local run, we set both the number of epochs and the number of nodes to 1.
kedro run --params data_science.active_modelling_pipeline.model_options.epochs:1 --params data_science.active_modelling_pipeline.model_options.num_nodes:1Local kedro run should finish with a success and similar log messages:
[10/21/22 16:22:53] INFO     Model has a coefficient R^2 of 0.465 on test data.
                    INFO     Model has MAE of 768.543 on test data.
                    INFO     Completed 6 out of 6 tasks
INFO Pipeline execution completed successfully.We can now test out our pipeline in the cloud and launch it on Azure ML Pipelines with the help of our open source kedro-azureml plugin. Before running the pipeline, we need to build a docker image for it. This process is exactly the same as the one described in the plugin’s quickstart - just use kedro-docker and modify dockerignore to include the data/01_raw folder within the image. Build and push the image to Azure Container Registry (or another container registry of your choice - just make sure it’s accessible from the Azure ML Studio).
With the number of nodes initially set to 1 (no distributed training yet), we launch the job on Azure ML Pipelines like this:
kedro azureml run -s <your Azure subscription id>If you encounter any issues with the setup, you can always refer to the step-by-step video guide we’ve prepared here.
First, we need cuda support within the docker image, so we will use one of PyTorch Lightning’s official images as a base one. Remember that docker images with both cuda and PyTorch pre-installed tend to be large - the one we used was 5.9GB compressed and 12.0GB uncompressed. After installing Kedro and the project requirements, the uncompressed size goes up to approximately 12.3GB.
Before running the training in a distributed manner, a compute cluster with GPUs needs to be created in the Azure ML Studio. For a good price-to-performance ratio, we use STANDARD_NC4AS_T4_V3 machines with T4 GPUs (1 per machine). We also recommend using the scale to 0 capabilities of Azure ML compute clusters, so that the machines will only run when there is a job (Kedro pipeline in this case) scheduled on them.
Once we have prepared all of the required components, it’s time to add the actual support for distributed training into our Kedro PyTorch training node. This is where our plugin comes into play - with a simple decorator, we “tell” the Kedro-AzureML plugin to use distributed training for this particular node and that’s all you need!
from kedro_azureml.distributed import distributed_job
from kedro_azureml.distributed.config import Framework

@distributed_job(Framework.PyTorch, num_nodes="params:model_options.num_nodes")
def train_model_pytorch(
    X_train: pd.DataFrame,
    y_train: pd.Series,
    num_nodes: int,
    max_epochs: int,
    learning_rate: float,
    batch_size: int,
):
# (...) rest of the code
The @distributed_job takes 2 parameters - the first one is the name of the underlying framework (we support all of the options provided by Azure: PyTorch, TensorFlow and MPI) to be used and the second one is the number of distributed nodes we want to utilize. Note that this parameter is dynamic and can be changed by a simple parameter override and native Kedro capabilities, so you don’t have to hard-code anything!
Now, we build the image (with cuda as the base one), push it and launch the distributed job.
kedro azureml run -s <your Azure subscription id> --params '{"data_science": {"active_modelling_pipeline": {"model_options":{ "num_nodes": 2}}}}'If you want to increase/decrease the number of distributed nodes, you can use any param you want here, it’s up to you. The way you access the parameters for @distributed_job decorator is exactly the same as you do when you define the Kedro pipeline.
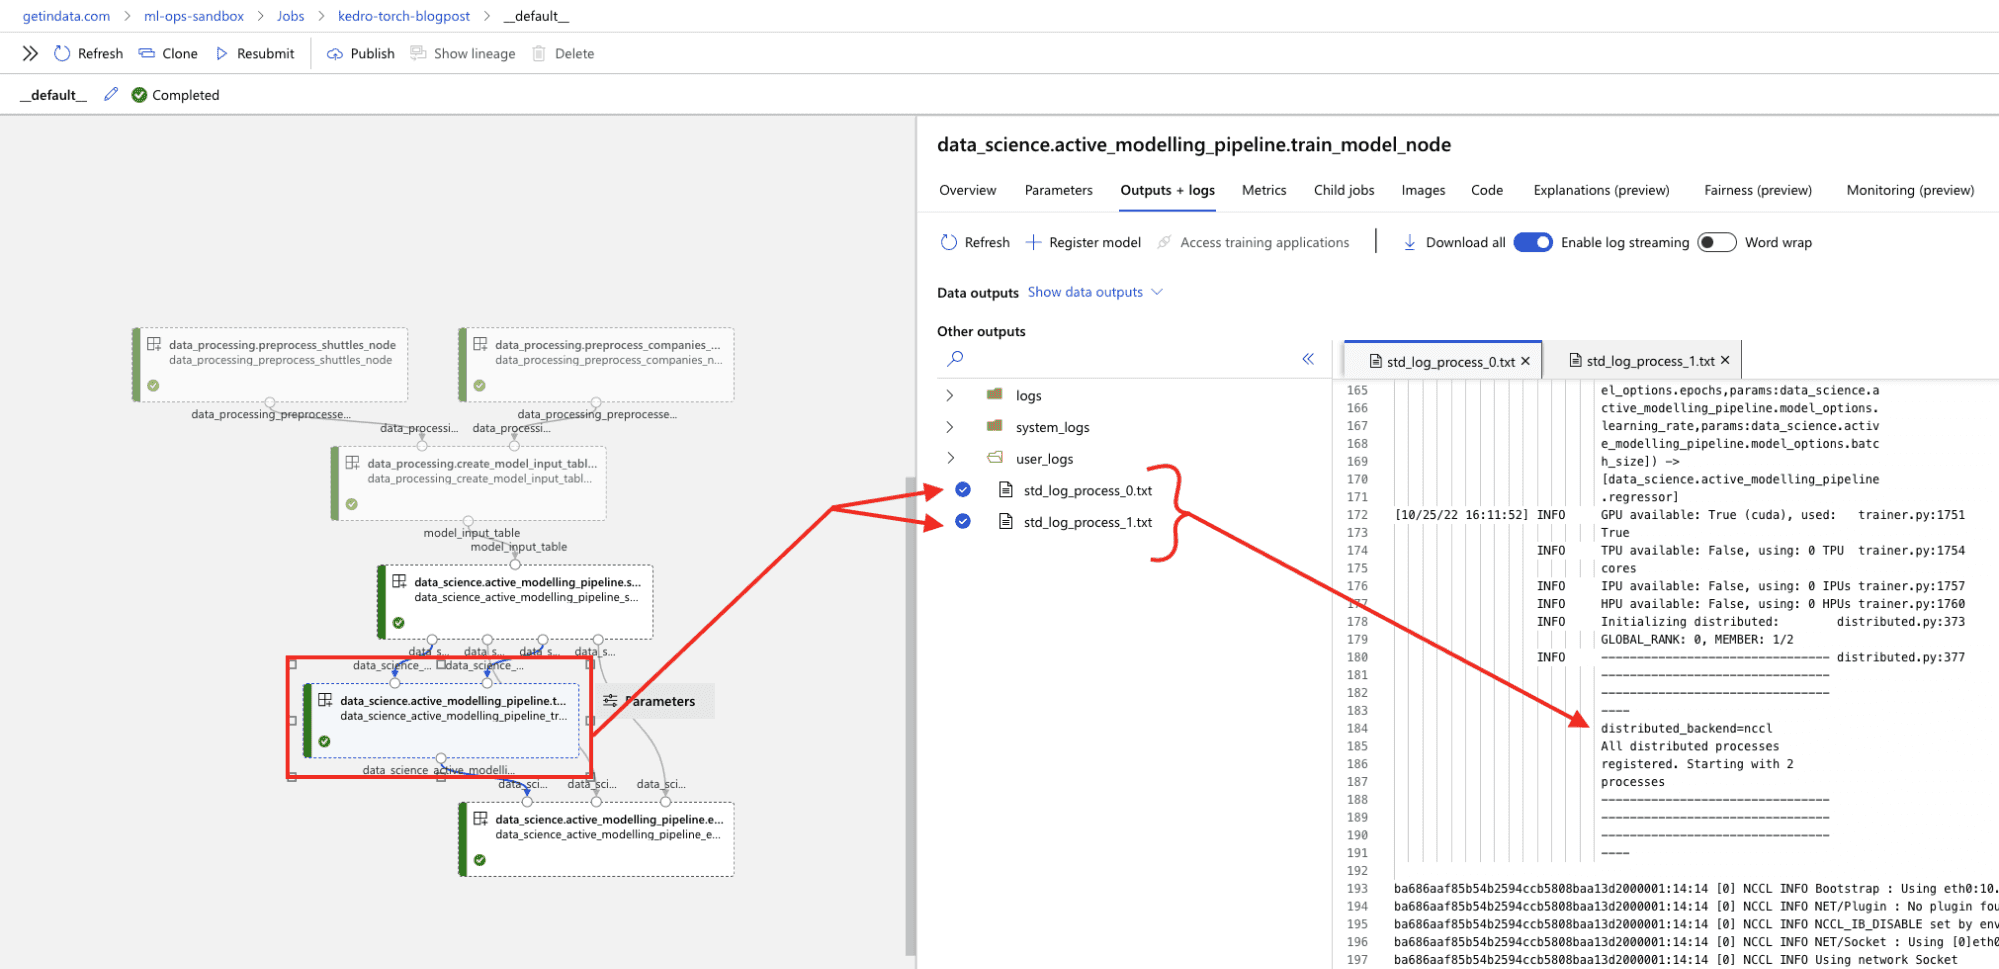
Running the distributed training job in Azure ML Pipelines should look like the screenshot below.

Note that within the train_model_node there will be 2 separate user logs, one for each of the nodes you use for training. The master node will be the one that saves all of the data and synchronizes the training process.
With our Kedro-AzureML plugin running, distributed with PyTorch/TensorFlow, training jobs should be a breeze. This also leverages one of the selling points of public cloud - the ability to quickly scale up when needed and zero costs when computational resources are out of use. This will keep the Data Scientists happy with relatively short pipeline execution time, and the finance department relieved by keeping the monthly bills down. We highly encourage you to try it out by yourself!
The whole project used in this blogpost is available as a reference on GitHub:
https://github.com/getindata/example-kedro-azureml-pytorch-distributed
If you encounter any issues with our plugin or if you have some feature requests, feel free to create an issue on the Kedro-AzureML plugin’s GitHub: https://github.com/getindata/kedro-azureml or on the official Kedro’s Slack.
___________
Did you like our post? If you want more, do not hesitate to download our free Ebook “MLOps: Power Up Machine Learning Process. Introduction to Vertex AI, Snowflake and dbt Cloud”.
Data Studio is a reporting tool that comes along with other Google Cloud Platform products to bring out a simple yet reliable BI platform. There are…
Read moreIn this blogpost series, we share takeaways from selected topics presented during the Big Data Tech Warsaw Summit ‘24. In the first part, which you…
Read moreData Pipeline Evolution The LinkedIn Engineering blog is a great resource of technical blog posts related to building and using large-scale data…
Read moreHave you ever searched for something that isn't typical for you? Maybe you were looking for a gift for your grandmother on Amazon or wanted to listen…
Read moreDespite the era of GenAI hype, classical machine learning is still alive! Personally, I used to use ChatGPT (e.g. for idea generation), however I…
Read moreIn data engineering, poor data quality can lead to massive inefficiencies and incorrect decision-making. Whether it's duplicate records, missing…
Read moreTogether, we will select the best Big Data solutions for your organization and build a project that will have a real impact on your organization.
What did you find most impressive about GetInData?