


Tutorial
Power of the Big Data: Industry
Welcome to the third part of the "Power of Big Data" series, in which we describe how Big Data tools and solutions support the development of modern…
Read moreThis blog series is based on a project delivered for one of our clients. We splited the content in three parts, you can find a table of content below. Dive in!
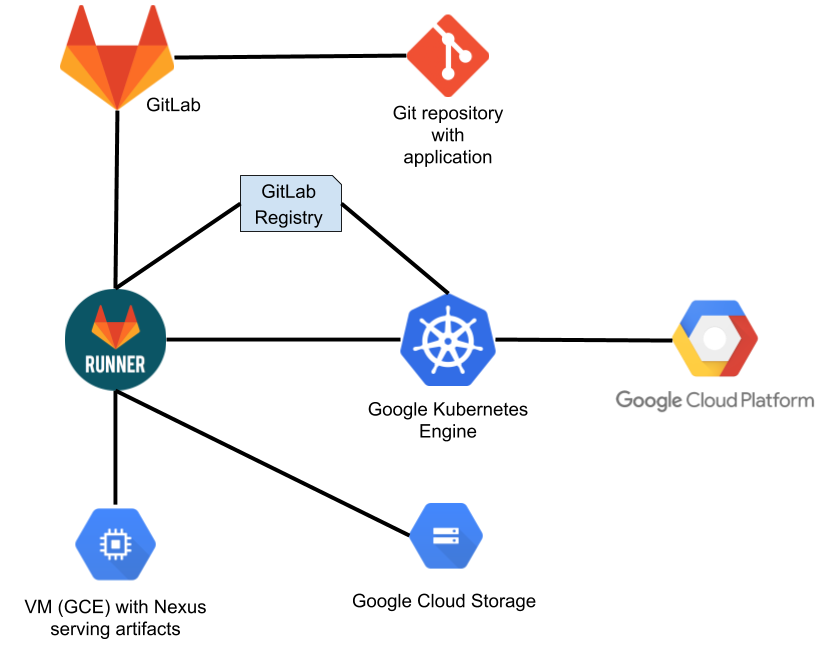
As part of a project for one of our clients, we had to solve the problem of building and deploying an application consisting of 30 services. About a year ago, this application was developed using the waterfall model, but the client decided to adapt its practices to the agile model. We have built a pipeline based on GitLab, which allows us to build all services as quickly as possible and upload them to the artifacts server.
Building one service consists of the following steps:
Before we modified (accelerated) the process of building the entire application, the components were built one by one. The whole process took about 40 hours. This meant that developers had to wait a long time for feedback.
Individual services that make up the application can be built in parallel (independently). Thanks to this parallelization of the building process, we have reduced this time to 4 hours. Building the entire application starts every day at 20:00 and ends at midnight. During the night everything will build up. And there is still time to do the tests.
We based our solution on GitLab as a service.
In this article we will describe what problems we encountered and how we solved them.
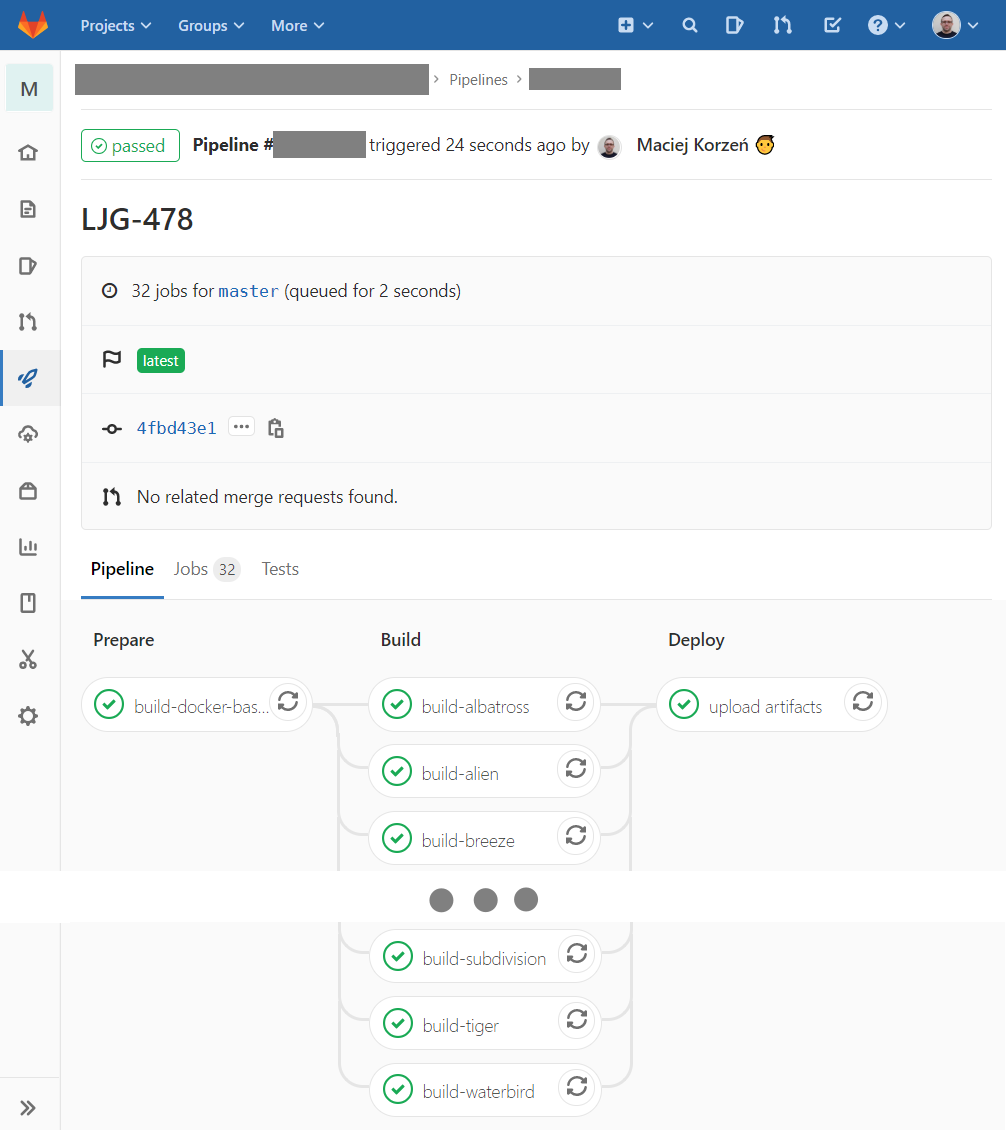
This is how the pipeline looks in GitLab:
General description of the pipeline:
GitLab has a limit on the amount of output displayed from a job. After exceeding the limit, we see the following output (important elements are marked with a red, dotted line):
In the beginning we tried to limit the amount of output generated by job-building services by ignoring (egrep -v) unnecessary messages, but this is a time-consuming task and requires adding more rules (regular expressions) from time to time.
Ultimately, we decided to save the entire output to a file in the container file system and save it to Google Cloud Storage. Once implemented, such a solution does not require returning to it later (as opposed to the first solution). In addition, we have the full output which can be very big. The disadvantage of this solution is that during the CI/CD job, we can't see the output in real time. We only see the final fragment of the output when the process of building the service is completed. However, in practice this is not a huge disadvantage, because if the process of building the service continues, it usually means that everything is OK watching the output in real-time will not change the result.
Increasing the limit in the runner configuration in our case was not taken into account, because we used shared runners provided by gitlab.com as part of a paid package. When we ran out of shared runners time, we used runners running on our Kubernetes cluster (GCP). We prefer to use shared runners (when available) to optimize costs.
This problem is common, and other users have also encountered it: https://gitlab.com/gitlab-com/support-forum/issues/2790
What should you do to be able to store output files in Google Cloud Storage?
We can connect to Google Cloud Storage using the gsutiltool. The slight inconvenience with this is that before we use this tool to manage files in our bucket, we have log in. The login process is interactive, which prevents it from being executed in CI/CD scripts.
However, you can work around this inconvenience, because interactive login creates disk configuration files that have all the necessary keys to connect to Google Cloud Storage and perform operations non-interactively. Just copy these files and place them, for example, inside the containers in which our CI/CD jobs are run.
Below is the instruction on how to perform the first login and copy the GCS key files. We will use a container image that already has the gsutilutility installed with all dependencies.
TERMINAL 1

$ docker run -ti --name gcloud-login-1 gcr.io/google.com/cloudsdktool/cloud-sdk:latest /bin/bash
docker$ cd /root
docker$ cat > service-account-credentials.json << EOF
... Paste credentials file here ...
EOF
docker$ gcloud auth activate-service-account --key-file=service-account-credentials.json
docker$ gsutil ls gs://__YOUR_BUCKET'S_NAME_HERE__
... some output ...
docker$ tar --exclude=.config/gcloud/logs -f gcs-cicd-credentials.tgz -C "${HOME}" -c .gsutil/ .config/gcloud/ service-account-credentials.json
Don't exit from the Docker container just yet. Open up second terminal and run:
Terminal 2

$ docker cp __CONTAINER'S_ID__:/root/gcs-cicd-credentials.tgz .
Now you can exit the container from the first terminal.
The gcs-cicd-credentials.tgz file should look like this:
gcs-cicd-credentials.tgz file and directory list

$ tar -vtf gcs-cicd-credentials.tgz
drwxr-xr-x root/root         0 2020-03-06 19:27 .gsutil/
-rw-r--r-- root/root         0 2020-03-06 19:27 .gsutil/credstore2.lock
-rw-r--r-- root/root      4465 2020-03-06 19:28 .gsutil/credstore2
drwxr-xr-x root/root         0 2020-03-06 19:26 .config/gcloud/
-rw-r--r-- root/root        37 2020-03-03 18:23 .config/gcloud/.last_survey_prompt.yaml
-rw------- root/root         5 2020-03-06 19:23 .config/gcloud/gce
-rw------- root/root     12288 2020-03-06 19:26 .config/gcloud/credentials.db
-rw------- root/root     12288 2020-03-06 19:26 .config/gcloud/access_tokens.db
drwxr-xr-x root/root         0 2020-03-06 19:26 .config/gcloud/legacy_credentials/
drwx------ root/root         0 2020-03-06 19:26 .config/gcloud/legacy_credentials/some-cicd-logs-upload-service-account@foobar.iam.gserviceaccount.com/
-rw------- root/root      1967 2020-03-06 19:26 .config/gcloud/legacy_credentials/some-cicd-logs-upload-service-account@foobar.iam.gserviceaccount.com/adc.json
-rw------- root/root       142 2020-03-06 19:26 .config/gcloud/legacy_credentials/some-cicd-logs-upload-service-account@foobar.iam.gserviceaccount.com/.boto
drwxr-xr-x root/root         0 2020-03-06 19:26 .config/gcloud/configurations/
-rw-r--r-- root/root        76 2020-03-06 19:26 .config/gcloud/configurations/config_default
-rw-r--r-- root/root         7 2020-03-06 19:26 .config/gcloud/active_config
-rw-r--r-- root/root         0 2020-03-06 19:26 .config/gcloud/config_sentinel
-rw-r--r-- root/root      2329 2020-03-06 19:25 service-account-credentials.json
We still need to download the configuration files created in such a way to the container in which we run the CI/CD jobs and install the gsutilprogram in it. For example, we can create a container image that already has these configuration files uploaded (unpack the gcs-cicd-credentials.tgz file in the user's home directory) and use it as the container base image in which CI/CD jobs are run.
Now we move to the last step of the whole process. In our case, we created a wrapper script that:
The name of the service to build is given as the first command line argument to the wrapper.
Example of the content of such a script:
service-build-wrapper


#!/bin/bash -xe

logFileName=$(mktemp /tmp/log-${CI_PROJECT_NAME}-$(date +%Y%m%d-%H%M%S)-job-id-${CI_JOB_ID}-job-name-${CI_JOB_NAME}-XXXXXXXXXX)
touch "${logFileName}"

cat << EOF
#############################################################################################
Running job script. Please be patient. No output will be show until finish.
All output is saved to file on disk and at the end will be uploaded to Google Cloud Storage.
End of job output will be displayed here for your convenience.
It can take some time for the job to finish.
  -- $(date)
#############################################################################################
EOF

set +e
bash -xe "./build-${1}.sh" >> "${logFileName}" 2>&1
retcode="$?"
set -e
echo
echo "<job-output-end>"
tail -n 1000 "${logFileName}"
echo "</job-output-end>"
echo
echo "[I] Compressing log file"
bzip2 -9 "${logFileName}"
echo "[I] Uploading log file to Google Cloud Storage"
gsutil cp "${logFileName}.bz2" gs://foobar-gitlab-ci-cd-jobs-output/
echo "[I] Log file uploaded under name '$(basename ${logFileName}).bz2'"
rm "${logFileName}.bz2"
echo "[I] Date: $(date)"
echo "[I] Exiting with code '${retcode}'."
exit "${retcode}"
Thanks to this solution, we can store job logs as long as we need and we don't have to worry about their size.
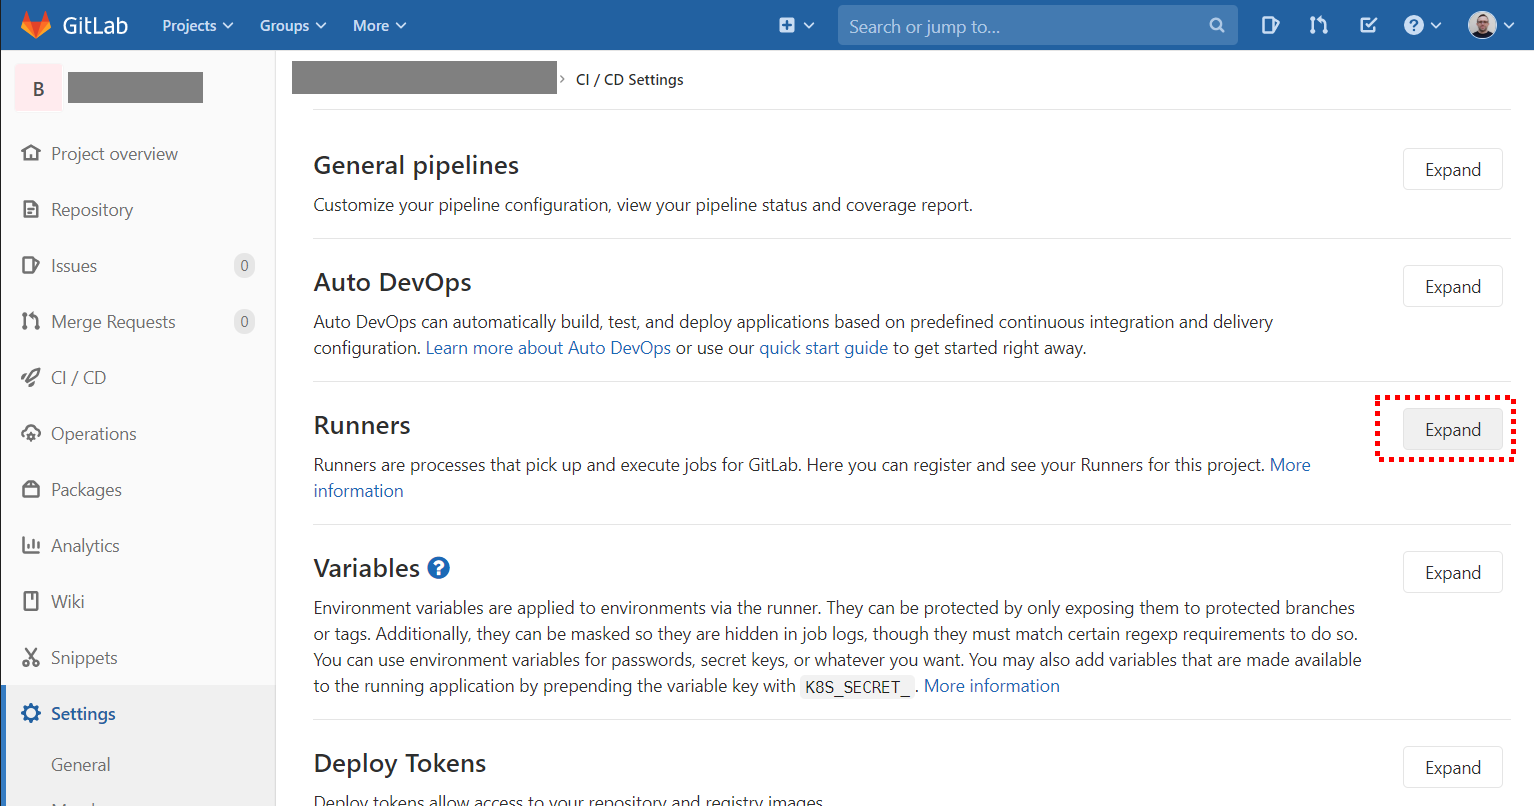
Building some of the services in our project takes more than 2 hours. The default job duration limit is 1 hour. You can change it inthe CI/CD settings of the repository in GitLab. We observed that shared GitLab runners only allow the limit to be raised to 3 hours. In our case, this was enough, even the longest job took less than 3 hours.
In the CI/CD job that has timed out, we can see the following messages (marked with a red dotted line):


If we need a limit of more than 3 hours, we must use our own runners. For example, you can use the Kubernetes cluster to run your own runners. GitLab has good integration with Kubernetes and you can quickly connect such a cluster to it. We observed that for runners running on Kubernetes, much higher time limits for the jobs are accepted (e.g. 8 hours).
The GitLab repository can run CI / CD jobs using both shared runners and our own runners at the same time. The runner on which the job will run is randomly selected. This allows you to optimize costs.
For the project in question, we chose to run additional runners on our own Kubernetes cluster.
Such a cluster can quickly be created using GKE and easily connected to GitLab.
We created the cluster as follows.
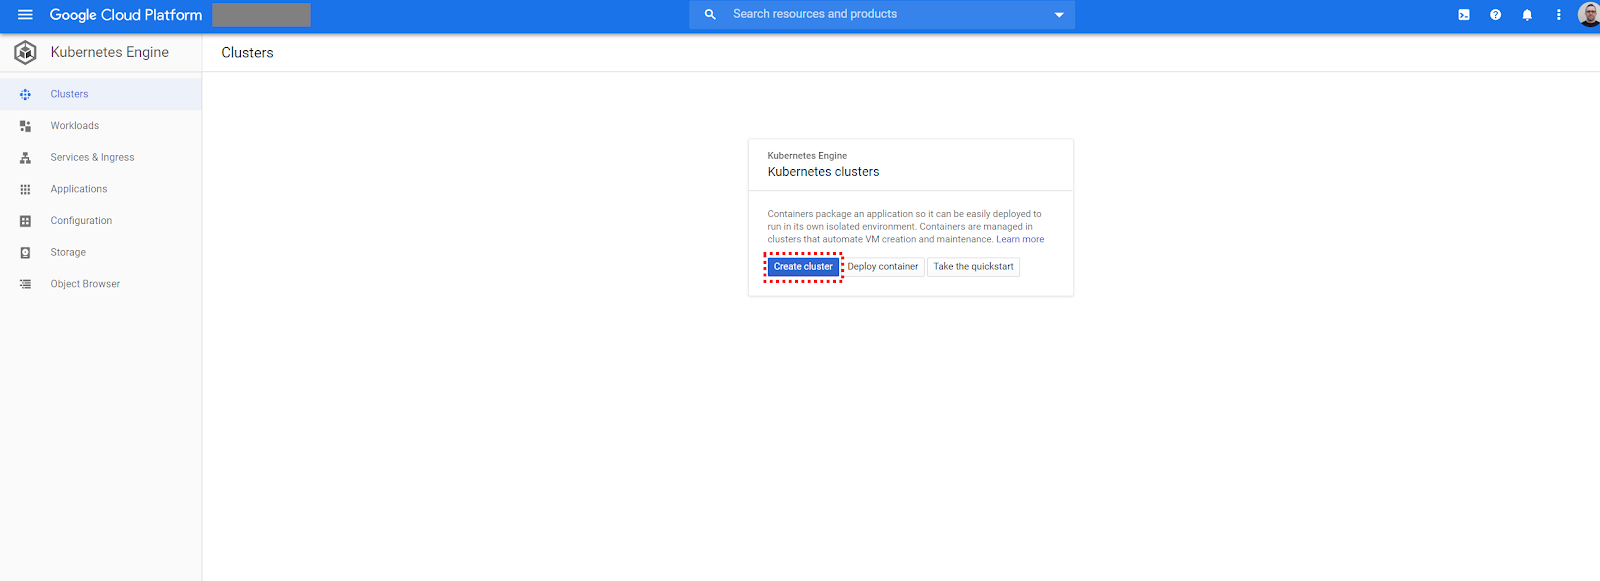
In the Google Cloud Platform, select Kubernetes Engine and click Create Cluster:
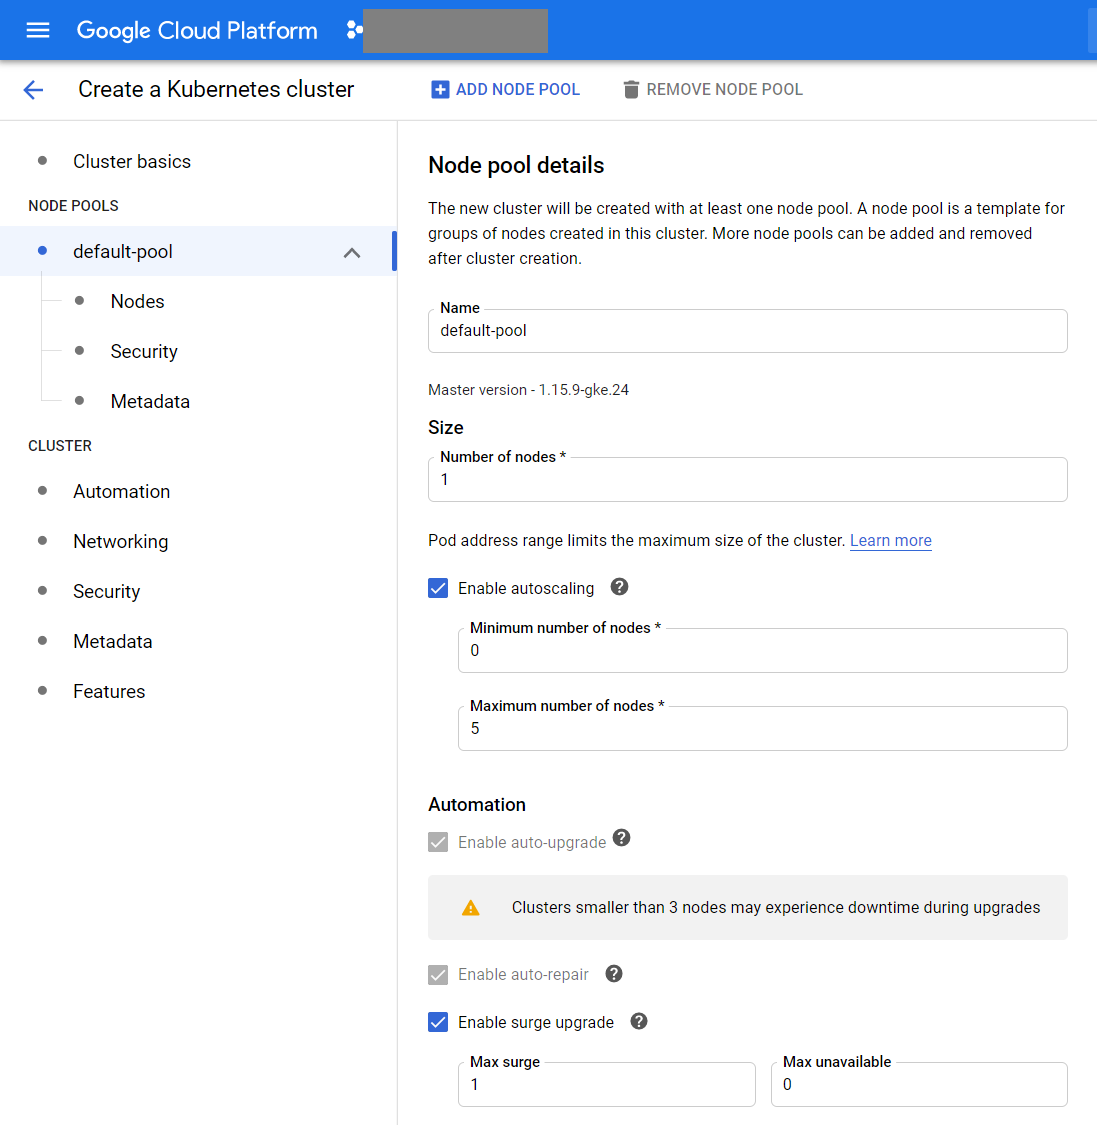
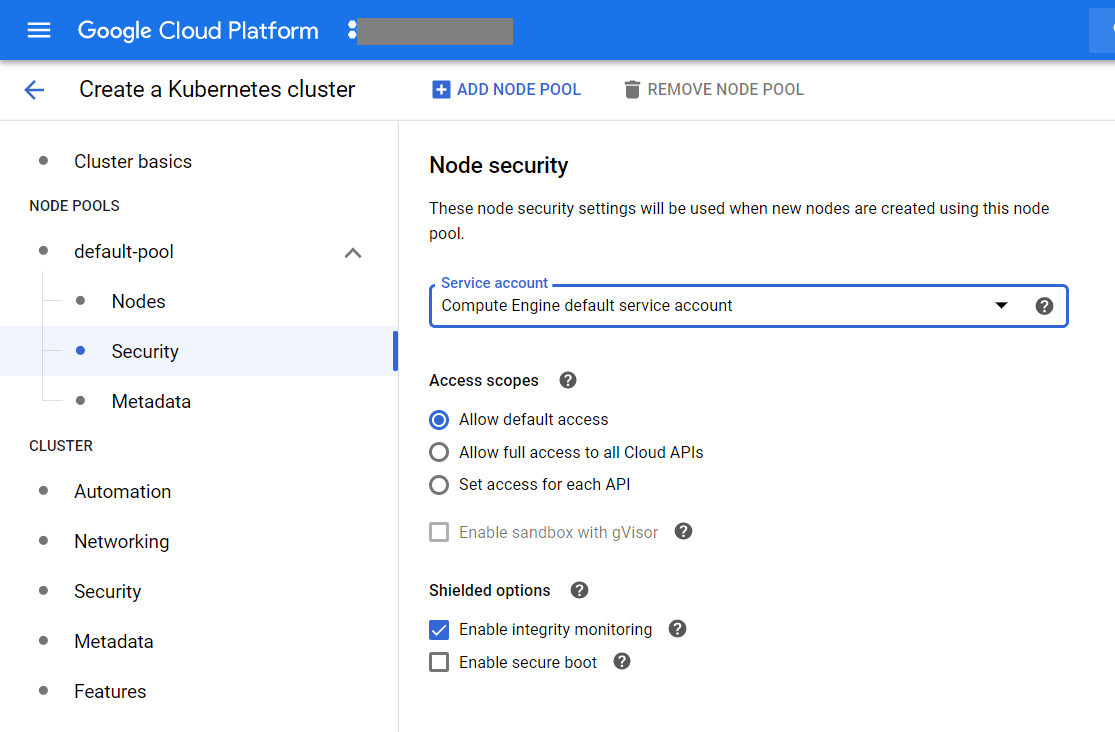
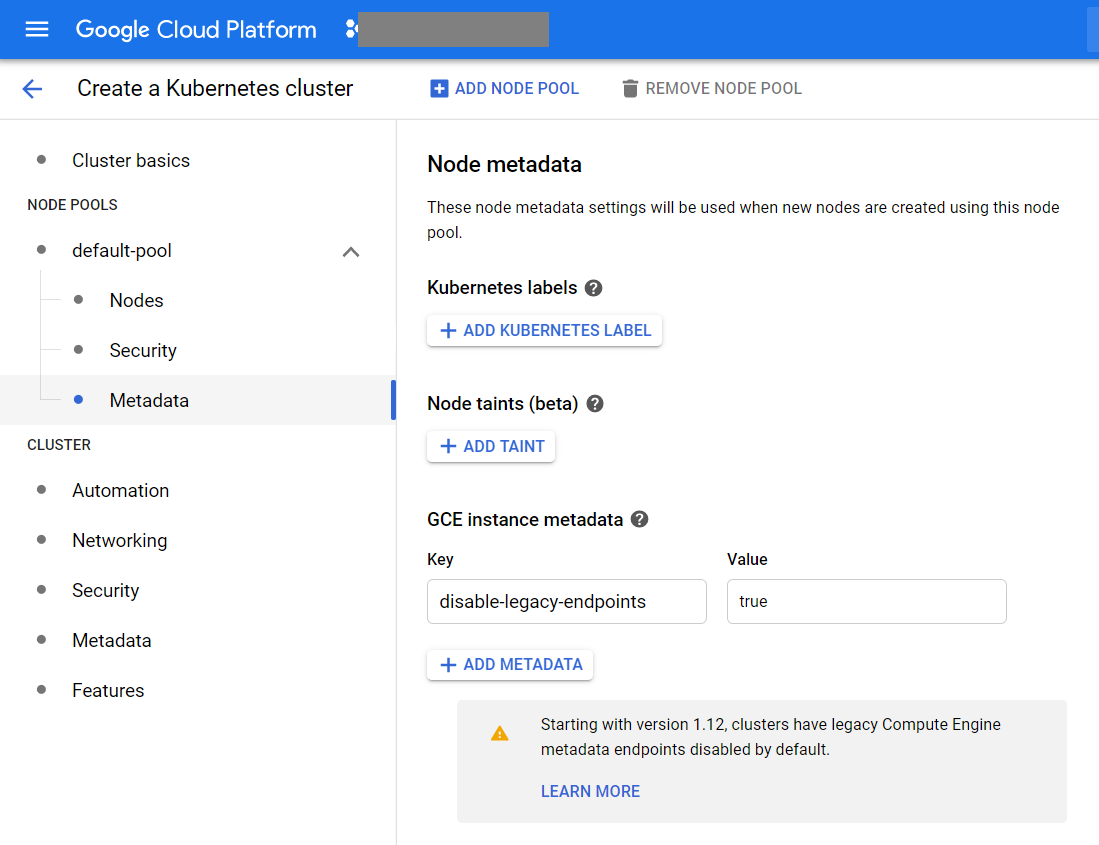
We go through the following wizard screens:
After creating the cluster, we check the number of working nodes:
We can connect to the cluster from the command line. The command that creates the .kube/config file with the appropriate content can be seen after clicking the Connect button.
$ gcloud container clusters get-credentials my-cluster-1 --zone us-aaa1-a --project my-project-1
Fetching cluster endpoint and auth data.
kubeconfig entry generated for my-cluster-1.
To view the list of nodes:
$ kubectl get nodes
NAME STATUS ROLES AGE VERSION
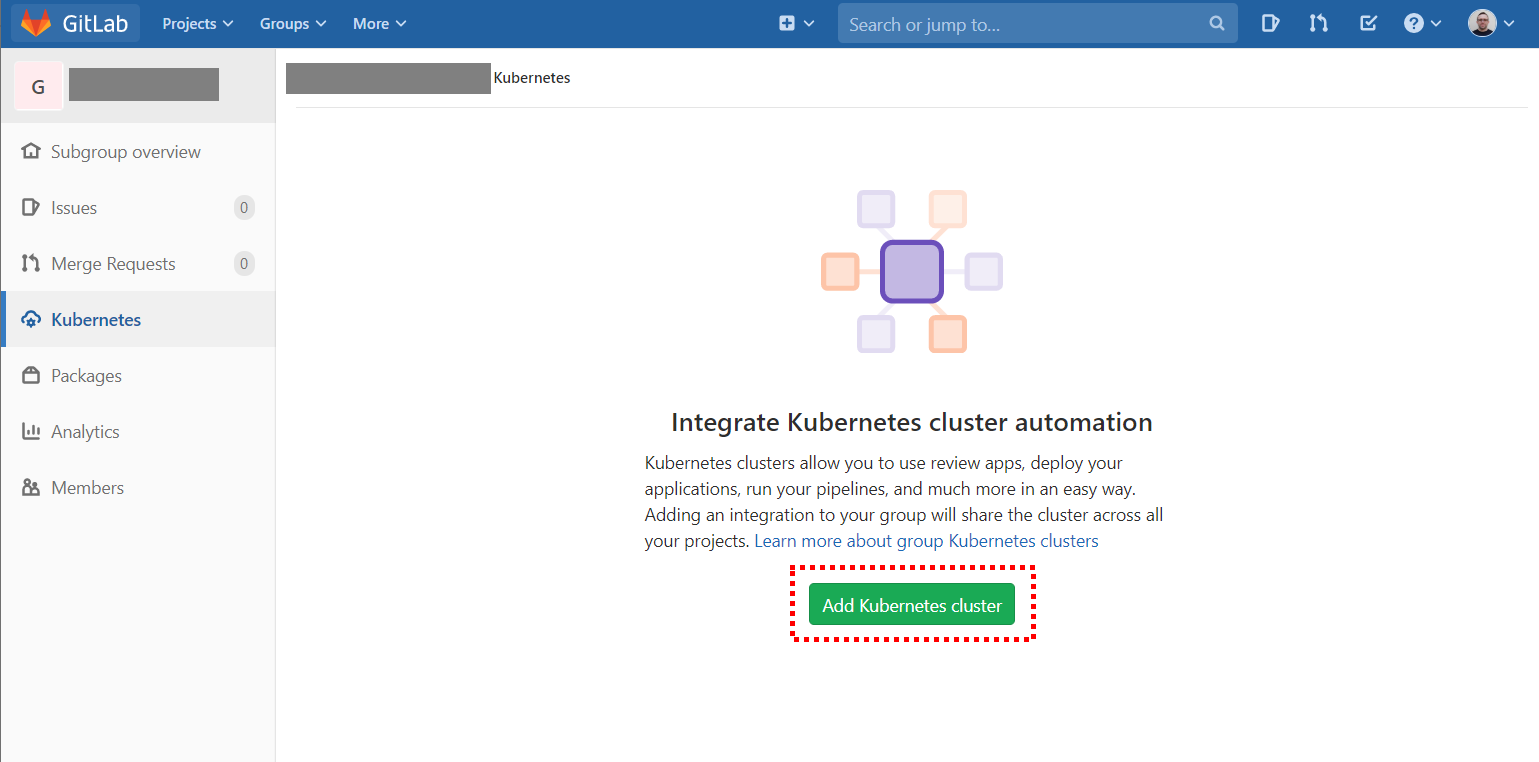
gke-my-cluster-1-default-pool-asdfghjk-1234 Ready <none> 15m v1.15.9-gke.24We now move to GitLab and find a group to which we will add a new Kubernetes cluster. Below are screenshots with the important elements highlighted.
A wizard will appear in which we will have to fill out various fields. In the instructions at https://gitlab.com/help/user/project/clusters/add_remove_clusters.md#add-existing-cluster include the exact commands to use to get the information you need from the cluster.
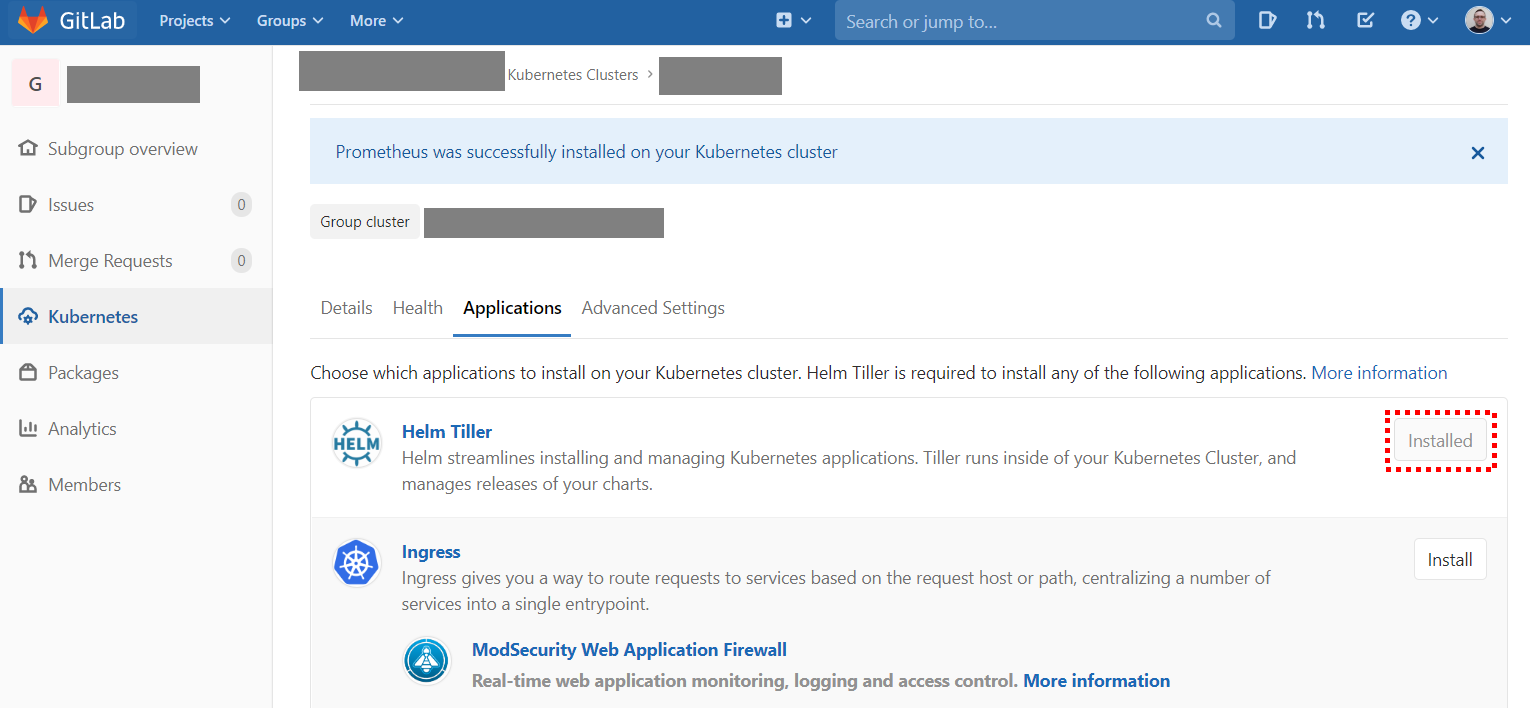
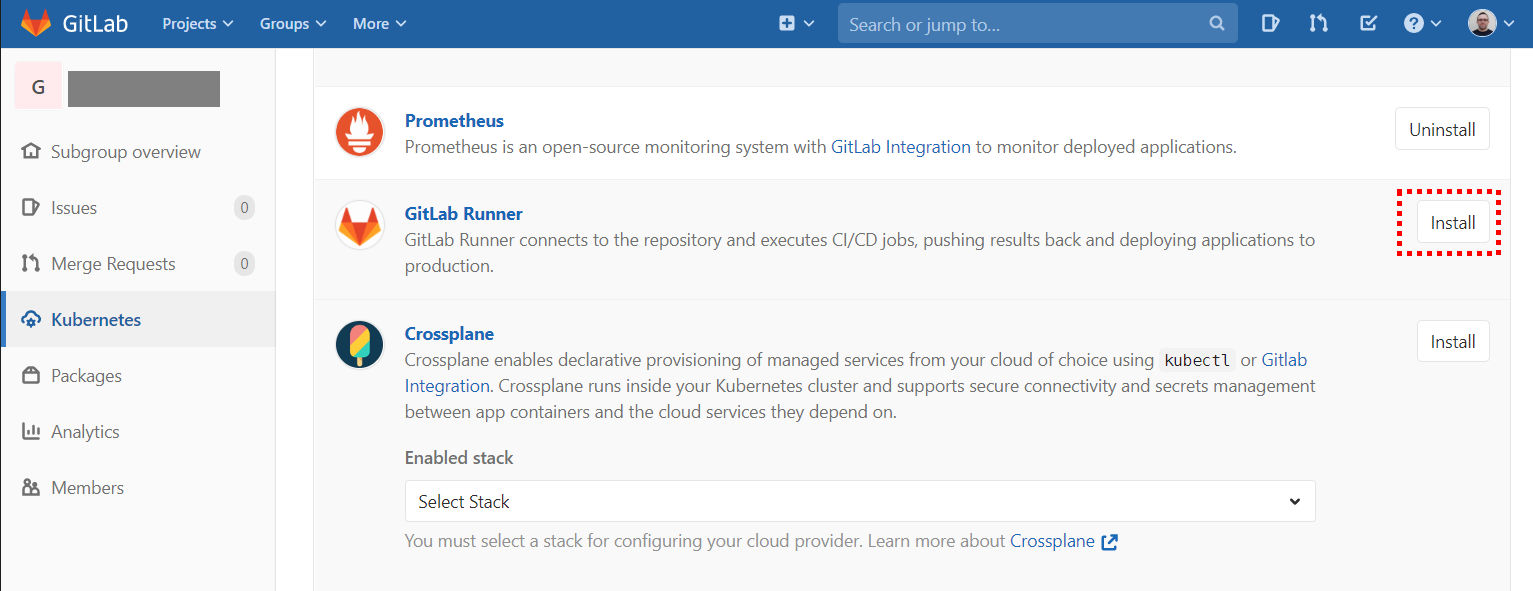
Once the cluster is connected to GitLab, the Helm Tiller and GitLab Runner services must be installed. This is done by clicking the marked buttons:
We can run the following command in a separate terminal window and we will see real-time information about events in the cluster:
$ kubectl get events --all-namespaces --watchIn the Runner list available for the repository, a group Runner should appear with the tags cluster and Kubernetes:
Welcome to the third part of the "Power of Big Data" series, in which we describe how Big Data tools and solutions support the development of modern…
Read moreWhat is Apache Iceberg? Apache Iceberg is an open table format for huge analytics datasets which can be used with commonly-used big data processing…
Read moreGetInData, Google and Truecaller participate in the Big Data Tech Warsaw Summit 2019. It’s already less than two weeks to the 5th edition of Big Data…
Read moreIn today's world, real-time data processing is essential for businesses that want to remain competitive and responsive. The ability to obtain results…
Read moreAs the effort to productionize ML workflows is growing, feature stores are also growing in importance. Their job is to provide standardized and up-to…
Read moreStreamlining ML Development: The Impact of Low-Code Platforms Time is often a critical factor that can make or break the success of any endeavor. In…
Read moreTogether, we will select the best Big Data solutions for your organization and build a project that will have a real impact on your organization.
What did you find most impressive about GetInData?